My Oz....

This is where Wonderland and the land of Oz meet and play and create! Come join in the fun!

Wednesday, July 22, 2015

Mermaid Time in My Oz

I just bought a lovely new mermaid image by Rick St. Dennis from his Zibbet Store which is has a huge selection of digital images!  I also received the same week a fabulous grand prize winning of 5 complete sets of stencils from the Artists Cellar!  So I took a piece of cardboard and made a canvas from it!


The image is "Undersea Ballet" by Rick St. Dennis colored with Prisma colored pencils.  The cardboard was covered with gesso. I let that dry and then traced around the mermaid with a light blue Distress marker to keep from adding texture under her I used the water set of stencils and the bubble stencil from it to apply DecoArt modeling paste which dries transparent. I sprayed with glimmer mists from Lindy's Gang Sprays and DecoArt shimmer sprays.  Blues and green on the bottom and pinks, oranges, and golds on top.

Then glued her down with Tim Holtz's media matte medium.  I stamped the sentiment in black at the top "Dance Deep into the abyss" by Smeared Ink.

She was made for me! No challenges although I may enter her into some but I wanted this for myself!  And I love how she turned out!  Not perfect, I smeared the sentiment and thought it was fixed until I took a photograph, but I still enjoy looking at her!

Playing with a Face Sketch

I was reading a magazine and saw a face sketch challenge.  The challenge was on old one and you were supposed to take a photo of yourself and sketch it digitally or with charcoal pencil.  I took another direction with it instead of making a journal page with it; I decided to go for a collage effect.  It was fun and my knowledge of Photoshop is very limited so the colors did not cooperate with me but I kind of liked it.


This was eye opening as in some filters every line and wrinkle popped right out at me!  I do not like seeing  myself in photos, never have, but I made myself play with the images and decided it was okay.  My next one is using a filter that makes me look so old and wrinkled that it will make a fabulous dark make!  So be prepared it will not be pleasant to look at! :)

Happy Crafting and take a picture and have some fun playing!

Tuesday, July 21, 2015

Last Day for Lost Coast Designs New Release Challenge

Sliding in with this one!  Have had so many unexpected events happen this month and last month with the slightly odd scratching of both eyes within 5 days!  So determined to make it, I found a mixed media canvas and took a portion on it to use this lovely Lost Coast Designs Sun Goddess Right facing image on it.  I  stamped her and colored with Promarkers and fussy cut her out.  I also used the three small crowns set to stamp around the goddess!  


 I added the word "Empowered" to the side because she is such a 
strong image.

Word written with white gel pen outlined with a pink glitter gel pen.

Check out this fabulous selection of rubber stamps at Lost Coast Designs

Monday, July 20, 2015

My First Framed Images by Rick St. Dennis

These lovely little fairies became my favorites the minute I saw them!  And after coloring them, I was trying to decide on some homemade gifts for my doctor's wife and two of his nurses, all of whom I am honored to call friends!  Looking at my fairies even with my coloring skills! I decided to frame them and give them as the gifts. I had made some homemade papers by laying some cardstock under some projects I was spraying and then sopping up the extra spray with the paper.  Then a small spray of some shimmer spays by DecoArt and let them dry!  I love the shimmer and light colors. 


                                                       Image Frostberry Fizzelmorn
                                                              by Rick St. Dennis

                                                        Image Daiseydew Dawnmist
                                                             by Rick St. Dennis

                                                          Image Fantasia Foxpaw
                                                             by Rick St Dennis

This lovely digital images can be found at Rick's Zibbet Store, a virtual mega store of fabulous images!  Unfortunately my photo skills as you know are sub par and these do not do my little trio of lovelies any justice at all!  I am in love with them even more now that they are framed and ready for some homemade gift wrap! 


                                                           Happy Crafting!

Saturday, July 18, 2015

My Summer Birthday Fun for Dragons Lair Designs Inspiration Blog

As you know by now, we are revisiting some awesome summer fun kits from the Dragons Lair Designs Store.  My awesome son has a summer birthday!  So after finding my digital stamp "Summer Fun" because I love the beach so much, I needed an idea for how to use it.  I colored it up with some Bic Markits and added some sand colored seed beads for some dimensional "sand".  Then some Glossy Accents on the sun (it had to shine!) and the coconuts and water drops and the need for a place to use it!  By this time I had begun thinking of my son's upcoming birthday and my idea was right in front of me.  A goodie bag from a plain brown paper bag, even though I would not be using them for my son's birthday as he is an adult now ( will always be my baby, however!) but so many of these had been made over the years for him and my daughter! 


My label maker made a cute sentiment stuck on some bright yellow paper from the Dragons Lair Designs Store!
 

A close up of my seed bead "sand".

Hope you can take this idea and go look in the store for a digital stamp that fits your summer party theme and can gather the kids to help color them up and assemble the goodies inside!
Enjoy the rest of your summer and the time you have with the little ones and teens!  Coloring is a universal fun thing to do, so get out of the heat, sit on the floor, and color up some fabulous fun!

Please LIKE our Facebook page and check out our sister sites listed below!


Saturday, July 11, 2015

Happy Anniversary Alice! The Alice in Wonderland Hop!


Link to Blog Party

Happy Anniversary, Alice and Friends!


It is hard to believe 150 years of Alice in Wonderland by Lewis Carrol has been being enjoyed by young and old alike!  I  began thinking of this hop while working on one for the 4th of July.  The idea began to gel when I saw"The Crazy Queen of Hearts" image at Rick St. Dennis's Zibbet store.  She is such a big part of the story I decided to go a different direction with this hop and make her the focal point.  I knew I wanted something dimensional....and what to my thrift store wondering eye should appear but this fabulous grassy ceramic base that apparently held some type of serving dishes!  Ah Ha!  My base went from cardboard flip up to this!  


First the Queen was colored along with the Hatter bought at the same time at Rick's store, with some Prisma colored pencils with a touch of silver gel pen on her majesty!  And I used some quotes from my 2 Alice quote sheets.  These were inked with various colored ink pads.  The figures were made to stand by cutting strips of a cereal box and gluing to the back and then attaching to the base.


Now of course I couldn't leave Alice out all together! I choose to use her in her form after eating and drinking whichever made her small!  The mushrooms were made from a batch of porcelain air dry clay that I made using a YouTube recipe.  I was nursing/babysitting my grandpup so I sat and made mushrooms!  Alice is a lovely image from Ike's Art and I shrunk the image before coloring (bad idea!!) so excuse her coloring!  Another quote from my sheet.  And after drying, the mushrooms were the color of the stalks as I had added a bit of tan hoping for a flesh color as I had another plan for it.  So I hot glued the caps on and drew the lines on the stalks and under the caps with a brown Chameleon marker and painted the tops with acrylic paints and with the end of a paint brush added dots.


Here is Hatter with balloons and I fussy cut around his hand and added pieces from the twine for the bottle and cookie tag to place in his hand.  The loyal army painting the roses were so much fun to make!  The heads, hands, and paintbrush porcelain air dry clay and their feet/bases.  I took two cards and sandwiched in the chenille piece to attache their hands to.  Painted everything up and used same method as Queen to stand upright!  Their eyes were placed in indentations made while wet and are colored google eyes!  I love google eyes!  The roses also made of the same clay and painted in places with the red.  The green leaf was made by pressing air dry Crayola clay into one of Mom's ceramic molds.  The stem is a rolled up magazine page painted green acrylic and cut into pieces.  Behind them all is a cup made of felt bought long ago at a thrift store and a brand new Alice pin from SilverCrow Creations just arrived last week and glued on top!


And of course the table that caused the trouble!  Made from a clear glass round flat backed bauble from a dollar store with toothpicks forming a square base hot glued on the bottom and toothpick legs attached at the corners of the base.  Tags tied on with twine and a key place between the cookie (clay) and the bottle (filled with green acrylic paint).  Maybe my favorite piece on this.


My son took my pictures as I was having my never ending camera problem and took several different effects for each photo.  The other knight I like with this shadowed vintage look.  He his also painting his own flower.


Another angle and effect of the Queen and the table.  I also added some blue glass baubles around the base for some more dimension.

 
 Another look and photo effect of the whole crew!

Whew! Long post! But so excited about making this it was so much fun!  I didn't think about coloring well or being super neat with the clay; I just played and had a blast!

So off you go on you way down the rabbit hole to the next lovely on the list!  Please leave all these lovelies some love on their blogs!

Happy Crafting!  Oh my! Where are my manners?  For those leaving some love in the comments I will be drawing a name for a lovely Alice "happy" to be mailed to you after the hop!  Check back to see the winner's post! Ta for now!


Tuesday, July 7, 2015

It's Christmas at DominoArt in July!

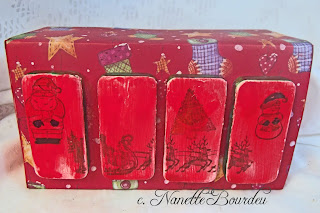
I loved the theme for DominoArt this month!  Christmas in July!  Christmas and dominoes? What more could I ask for?  I took an IPhone box of my daughter's destined for the trash and inside was a perfect little shadowbox! Yes, I am hung up on shadowboxes right now and tenny tiny things.  So I wanted my box to be topped with dominoes stamped for Christmas even before I realized what was in the box.  So I taped the backs of my dominoes in a straight row, painted with gesso, then put DecoArt's red fluid acrylics on the tops, misting with water to make it run down the dominoes.  A little painty and inky so you know it was fun!  When completely dry I stamped a sleigh and reindeer stamp in black from Michael's dollar bin, and used 3 little stamps from VivaLasVegas Stamps that were in my pound of rubber I got last week!  I wanted the markers to show up better on them but alas they did not so I left it thinking it looked a little vintage.  Oh, after stamping I cut them apart as I wanted to space them out on the box top.  Sanded the edges of most of the gesso and colored the sides green with Chameleon markers.  

I obviously covered the box with Christmas paper from my stash in two designs..forgot to add that! 


The inside I added burlap pager to the back of the shelves.  Then I added a tiny bottle brush tree from SilverCrow Creations and also the little turtle dove on the second shelf came from  their wonderland of fabulousness!  I made tiny packages from another sheet of paper from the pad. Adding some red bling and a tiny red string tie. These  were glued around the tree.  On the second shelf, Santa of course! (more about him in next pic) with turtle dove.  And the other elements were foam embellishments from a Christmas kit including the words "Merry Christmas".


 Now, Santa is made from a piece of a Japanese game given to me in a happy mail package, no idea what it is called as the instructions are in Japanese, too!  but fun shapes!  I took the foam embellies and stuck to the game piece with the flat part sitting on the shelf with his beard hanging over and "Christmas" overlapping his beard.


And here is the back of Santa!  Love this game piece's shape...hoping to use it for DominoArt's Mascot Doll Contest for a head...oops! I didn't say that!  Top secret info!
And with that my Christmas shadowbox was complete!
Now you know the theme and you know where to go so grab some game pieces and play along!  The Domino Queen aka Sharpie Queen is waiting for YOU!
Happy Crafting! 

Entering 613 Avenue "Anything Goes with Optional Twist of Flag"
http://avenue613.blogspot.com/2015/07/challenge-131-anything-goes-woptional.html


My First Tag for the Tim Holtz 12 Tags of 2015

I have wanted to do this since last year when I saw a badge on a friend's blog!  She was a winner of June's tags! So of course I had to try one for July! On Tim Holtz's blog you will find all the information needed to enter the 12 Tags of 2015!   You use Tim's tutorial for inspiration and for July it was Fourth of July tag.  So tag in hand I used a VivaLasVegas stamp of Uncle Sam (he resembles Santa to me) and followed the tut with my Distress Markers. You can find all the products Tim uses on the same blog at the bottom, the Distress Markers, stamps, stickers, etx.  The link to the tags is listed below where the tutorial is found.  Some ephemera from Tim's pack and a ChitChat sticker were added.  I also used some beads for the string I added to the top.  I stitched around the edges of the tag with my sewing machine.  I added some rub ons for 4th and that was it! Easy Peasy!

Monday, July 6, 2015

Dragons Lair Designs Summer Fun!

This summer we are taking the time to revisit some fun images and fun kits to play with for our makes!  I saw the popcorn image and it screamed "Summer!" and having made some jewelry last month, the two ideas merged again!  Then I had some lovely papers from the "Rainbow Bundle" kit from the Dragons Lair Designs Store and I found a pin wheel pattern, oh how I loved them as a child and still do! :)  So those two items merged into 2 lovely pinwheels!  I have made them on short sticks (colored pencils for picture purpose) but I absolutely love them! I used the patterned side of the paper and colored the back of the paper with a red marker.  I could have back the patterned paper with a lovely red piece from the collection but it would have been too thick to manipulate the pinwheels to make them. 

Here are my pinwheels!  And my popcorn earrings hanging on the jar!

The earrings..
I colored the image full sized with Bic MarkIts.  Then I shrunk the image down on my printer but will do another pair from Photoshop in my initials in red in the circles. I then pressed them into embossing ink pad and used UTEE to cover them, then I shook it off and used my heat gun to melt it into the awesome shiny finish.  I only did this once because one coat leaves a slightly bubbled appearance and for the popcorn it was perfect.  Then made a big jump ring and hooked into earring finding!
Now it is you time to go look at the store (links below!) and shop for some things so that you can play with your children by making pinwheels and playing!  And while you are at it, if you have older kids make a pair of earrings with your daughter!  Have fun!!
Happy Crafting!
Like us on Facebook!
Links to our sister sites.....

Dragons Lair Designs Links:

Saturday, July 4, 2015

Yes! It is the 150th Anniversary of Alice in Wonderland! Join Our Blog Hop and Celebrate!


Today we are celebrating the 150th Anniversary of Alice in Wonderland, and what better way to do that, than to share lots of creative projects inspired by this wonderful story.

Not only will you see lots of amazing artwork today, but you can also win prizes from the following amazing companies;


Prize winners will be selected from Random blogs throughout the hop using Random.org to select each winner.  In order to be eligible for a prize you must visit all stops on the hop and leave a comment. The prize draws will be open until July 18th, with winners announced on July 20th.

Here's my Alice in Wonderland inspired project;


Blog Hop List

 This Alice image and the Eat Me image are from I Brake for Stamps and are by Rick St. Dennis.  Colored with Promarkers and some Chameleon markers. 
 I used a tile and glued beads onto the bottom of the tile to make a vanity tray.  The corner elements are air dry clay made with a mold used for an anniversary wedding cake for 
my parents.  I decided I would use it more with clay! :) Colored them with sprays by 
DecoArt, Recollections, and a homemade glitter spray.
I adhered the images with tacky glue and sealed with Ranger brand Multi Medium Matte
and then put the second images I colored: the cup hat, the cupcake, tag, and bottle top on 
foam dots for dimension.  And I added some sead beads for sprinkles on cupcake and some string colored with Distress Inks, tied and glued on the tag.  For her necklace, I cut a piece of chain and hot glued to her blouse and then hot glued on the rabbit charm.
 The sentiments were typed in Photoshop and cut out and sprayed with my light green 
homemade sparkle spray.

Now it is ready to set on my bedroom vanity and I can celebrate Alice everyday! Now off you go to Jenn's blog and leave some love for all who participated in the hop!  It makes them
feel wonderful and YOU can win a wonderful prize from our wonderful sponsors!
Happy crafting and Happy Anniversary Alice and the Gang!!

Entering My Little Whimsical World Challenge "Anything Goes" July

Thursday, July 2, 2015

I Am Playing How ABout You?

It is the 150th anniversary of this beloved classic!  Got to aFancifulTwist.Co here and check the festivities out!  I am playing why don't you? See you here on July 11, for the party! 


Happy Crafting!